Best Paint for Kitchen Cabinets Painting kitchen cabinets is one of the easiest and most cost-effective ways to completely transform the look and feel of a kitchen without committing to a full renovation. Over the years, homeowners have realized that a fresh coat of paint can modernize outdated finishes, brighten dark spaces, and bring new life to cabinetry that may have otherwise required replacement. The right paint can enhance durability, resist daily wear, and maintain a flawless finish even in high-use areas. This guide explores everything you need to know to choose the best paint for kitchen cabinets, from product types to application techniques and long-term maintenance.
Rather than simply listing recommended brands, this article breaks down the science behind cabinet-specific paints, explains how different finishes affect appearance, and identifies which products perform best under varying conditions. Whether you’re a DIY enthusiast aiming for professional results or a homeowner considering hiring painters, understanding paint quality and compatibility is critical. By the end of this guide, you’ll know precisely what to look for and what to avoid when choosing the best paint for your kitchen cabinets.
This article is designed for everyone—from first-time DIYers to seasoned renovators. The kitchen is the heart of the home, and the cabinets often take center stage. Choosing the right paint can extend their lifespan, enhance their beauty, and ensure your investment lasts for years. With detailed breakdowns, expert recommendations, and practical insights, this guide serves as your complete resource for creating stunning, durable, beautifully finished cabinets.
Understanding Kitchen Cabinet Surfaces
Kitchen cabinets come in a wide range of materials, and each one responds differently to paint. Solid wood is among the most forgiving, as it allows primer and paint to adhere well and can easily be sanded to correct imperfections. MDF is another popular material that takes paint smoothly due to its uniform surface, though it requires careful sealing to avoid moisture absorption. Laminate and thermofoil, however, require bonding primers and specific paints because their slick, factory-sealed surfaces resist adhesion. Metal cabinets, though less common today, need paints formulated for non-porous surfaces to ensure durability.
Before painting, identifying your cabinet’s existing finish is essential. Cabinets may have a factory-applied lacquer, oil-based varnish, polyurethane, stain, or an older layer of standard latex paint. Each finish behaves differently when exposed to new paint, and using the wrong type of primer can cause peeling, bubbling, or uneven coverage. A simple test—such as lightly scraping with a fingernail or using rubbing alcohol—can help determine whether the existing finish is oil- or water-based. This understanding guides the preparation process and ensures proper adhesion.
Surface issues are also important to recognize early. Kitchen cabinets often accumulate grease, moisture stains, smoke residue, or worn spots in high-touch areas such as handles and edges. Paint cannot fix structural issues like warping or water damage, but it can successfully cover minor imperfections after proper prep work. Knowing the limitations of paint allows you to assess whether your cabinets are good candidates for refinishing or whether they require more extensive repairs before painting begins.
What Makes a Paint “The Best” for Cabinets?
The best paint for kitchen cabinets excels in durability, offering a hard finish that resists scratches, chips, and daily wear. Since cabinet doors are frequently opened and closed and exposed to grease, heat, and moisture, ordinary wall paint simply won’t hold up. High-quality cabinet paint is formulated with advanced resins that cure into a tougher surface, making them more long-lasting than general interior paints. This durability ensures your cabinets maintain a clean, fresh look without constant touch-ups.
Adhesion is another key factor. Cabinet-specific paints contain bonding ingredients that allow them to grip slick or previously coated surfaces without peeling. This is especially important for laminate or glossy surfaces that can resist standard paints. Additionally, the ability to resist fading and yellowing over time is crucial, particularly for white or light-colored cabinets in kitchens with strong sunlight or fluorescent lighting. A good cabinet paint maintains its original tone even after years of exposure.
Finally, drying and curing time significantly affect the quality of your finish. While drying refers to the paint becoming surface-dry, curing refers to the paint achieving maximum hardness. The best cabinet paints dry quickly enough to reduce dust contamination but cure slowly enough to level out brush strokes and roller marks. Products with extended open time allow DIY painters to achieve a professional-level smoothness without spraying equipment. This combination of attributes—durability, adhesion, color retention, and proper curing behavior—makes certain paints stand out above the rest.
Types of Paint Used for Kitchen Cabinets
Acrylic paint is one of the most popular options for kitchen cabinets because of its low odor, minimal VOCs, and excellent color retention. Modern acrylic paints offer impressive durability thanks to enhanced resin technology. They dry relatively quickly and clean up easily with soap and water, making them ideal for DIY projects. However, acrylic paint may not achieve the same glassy, hard finish that oil or enamel paints provide, so it’s often better for cabinets in low- to moderate-use kitchens.
Alkyd paint, particularly waterborne alkyd formulas, bridges the gap between traditional oil paint and modern acrylic. These paints offer the smooth, hard finish associated with oil paints but without the high VOC levels and long drying times. Alkyd enamels are exceptionally durable, easy to clean, and resistant to chipping, which is why many professionals prefer them for cabinets. Oil-based paints, although less commonly used today due to environmental regulations, still provide unmatched hardness but come with drawbacks such as yellowing, strong fumes, and complicated cleanup.
Chalk paint, while trendy, is not always the best choice for kitchen cabinets. It is easy to apply and offers a charming matte appearance, but it requires sealing with wax or polyurethane to maintain durability. Spray paints and lacquers deliver ultra-smooth finishes that mimic factory coatings, but they require sprayers, ventilation, and technical skill. Ultimately, your choice depends on your goals—ease of application, durability, cost, or appearance.
The Best Paint Brands for Kitchen Cabinets
Benjamin Moore Advance is a favorite among professionals thanks to its waterborne alkyd formula that provides superior leveling and a hard, furniture-like finish. It dries slowly, allowing brush strokes to settle and disappear, making it an excellent choice for DIYers seeking a sprayed appearance without specialized tools. Its low VOC content makes it safe for indoor use, and its durability ensures cabinets look pristine for years. Advance is particularly recommended for white and light colors due to its excellent color stability.
Sherwin-Williams Emerald Urethane Trim Enamel is known for combining durability, elegance, and ease of application. Its urethane-enriched formula creates a tough, scratch-resistant surface ideal for busy kitchens. The paint levels beautifully, making it suitable for both brushed and sprayed applications. Its exceptional adhesion ensures strong performance even on glossy or previously painted cabinets. This product is ideal for homeowners seeking a long-lasting finish with high-end results.
Budget-conscious homeowners often choose Behr Urethane Alkyd Enamel for its cost-effective performance. This paint offers a durable, semi-gloss finish that holds up well in high-traffic areas, making it a strong contender for kitchens. Rust-Oleum Cabinet Transformations is another unique option, offering a kit-based approach with everything needed for refinishing. Farrow & Ball Modern Eggshell appeals to homeowners seeking premium finishes with rich pigments and elegant depth, while Annie Sloan Chalk Paint is best for creative or decorative cabinet projects.
Choosing the Right Finish
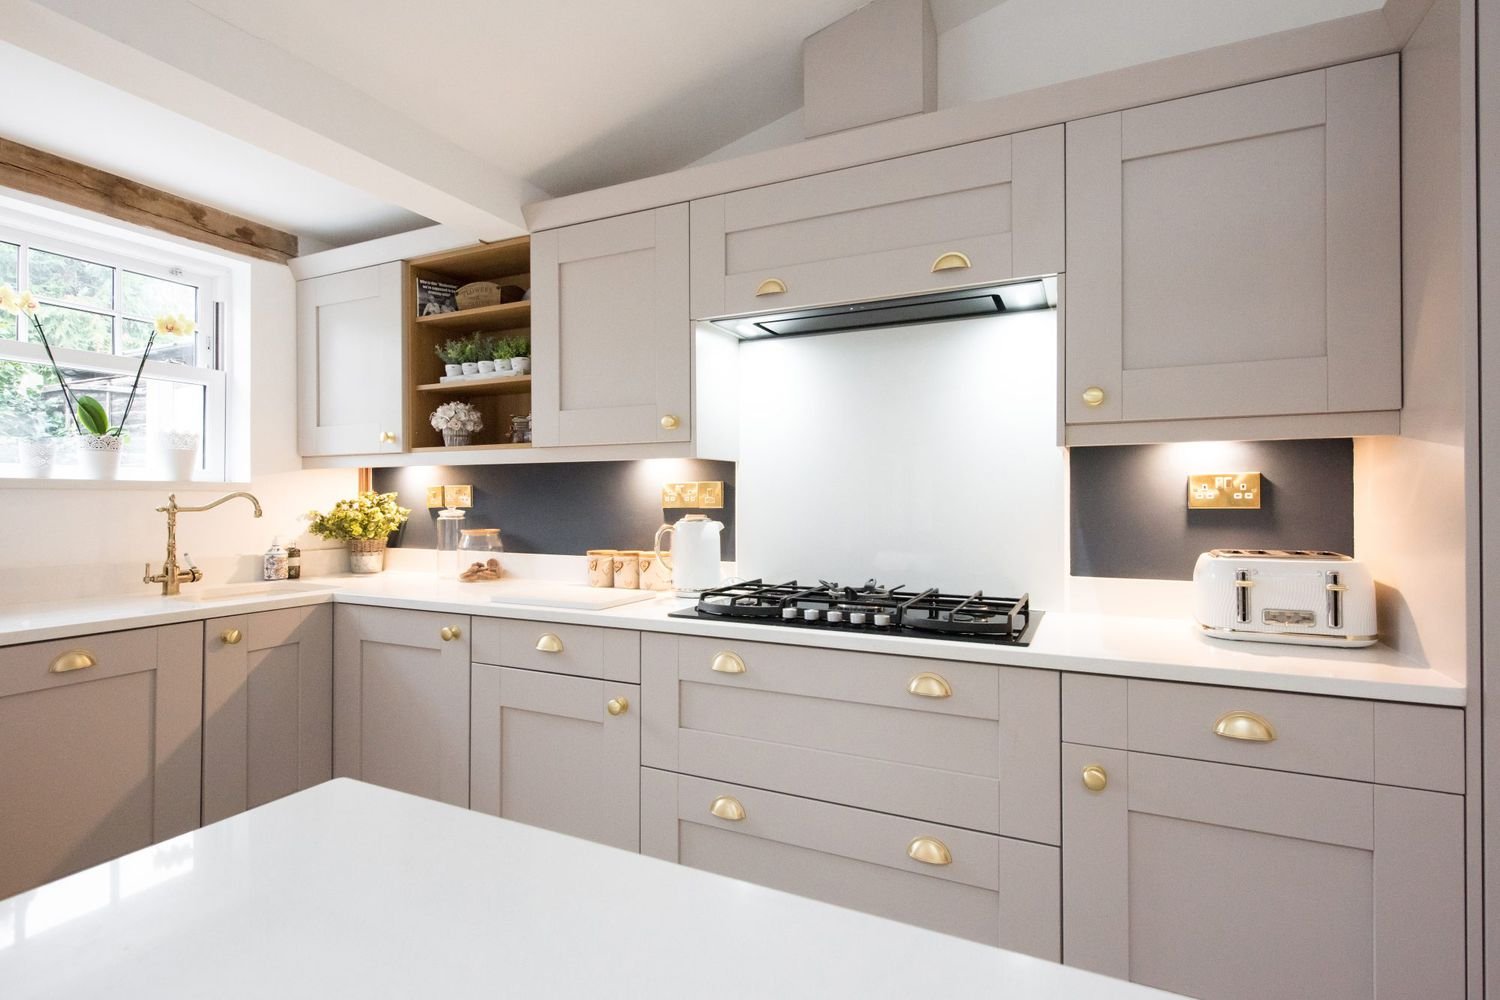
Selecting the right finish is just as important as choosing the right paint type. Satin is one of the most popular finishes because it provides a soft sheen that hides imperfections yet remains easy to clean. It works well in traditional, farmhouse, and transitional kitchens where a subtle glow is preferred. Satin finishes offer a balanced blend of beauty and practicality, making them ideal for families or homes with moderate cabinet usage.
Semi-gloss is the go-to finish for high-traffic kitchens due to its durability and reflective qualities. It stands up well to frequent cleaning and resists stains, grease, and moisture—common challenges in busy cooking areas. The slight shine also enhances the color, making cabinets appear brighter and more vibrant. However, semi-gloss reveals imperfections, so proper prep work is essential to achieve a smooth, even appearance.
High-gloss finishes deliver a bold, modern look reminiscent of ultra-sleek contemporary kitchens. They reflect light dramatically and create a striking visual impact, especially in white or dark colors. The downside is that high-gloss surfaces show fingerprints, scratches, and flaws more easily, requiring meticulous preparation and maintenance. While stunning, they are best suited for low-touch areas or homeowners committed to regular upkeep.
Color Selection Strategies
Choosing the right paint color can transform the atmosphere of your kitchen entirely. Trending colors include soft greens, navy blues, warm grays, and rich charcoal tones, all of which lend a stylish and sophisticated aesthetic. White remains a timeless favorite, brightening the space and making kitchens appear larger. For a more modern look, deep forest greens and near-black hues create a dramatic effect without sacrificing elegance.
Classic colors such as cream, taupe, and natural wood stains remain popular due to their versatility and ability to complement a wide range of interior styles. These colors are ideal for homeowners who prefer a warm, neutral palette that won’t go out of style. Earthy tones like olive, mushroom, and clay offer subtle visual interest while maintaining a calming aesthetic.
Lighting is a major factor in how colors appear. Natural daylight enhances true color, while artificial lighting—fluorescent, warm LED, or cool LED—can change the tone drastically. Two-tone cabinet designs, such as dark lower cabinets paired with light uppers, continue to gain popularity, adding depth and contrast. Islands painted in accent colors can also create a focal point and give your kitchen unique character.
Essential Tools and Supplies
The tools you choose for painting your cabinets will significantly impact the final results. High-quality synthetic brushes and foam rollers are ideal for water-based paints, allowing for smoother application with fewer streaks. Microfiber rollers are excellent for leveling paint evenly. For those seeking an ultra-smooth, factory-like finish, HVLP (high-volume, low-pressure) sprayers provide exceptional results but require proper masking and ventilation.
Primers are essential in the cabinet painting process. Bonding primers ensure paint adheres to slick surfaces such as laminate or glossy finishes. Stain-blocking primers prevent discoloration from wood tannins, especially in oak, cherry, or walnut cabinets. Oil-based and shellac-based primers offer the strongest adhesion and stain-blocking capabilities, though they require more ventilation during use.
Additional must-have supplies include sandpaper in various grits, degreasers for removing kitchen residue, tack cloths for cleaning dust, painter’s tape, drop cloths, and protective equipment like gloves and masks. Investing in proper tools dramatically improves the finish and helps prevent common painting issues such as drips, streaks, or uneven coverage.
Prep Work: The Most Important Step
Preparation is the foundation of a flawless cabinet paint job. Kitchens accumulate grease, grime, and residue that can prevent paint from adhering properly. Begin by cleaning all surfaces with a strong degreaser, ensuring every corner, edge, and groove is free of contaminants. This step alone can determine whether your paint job lasts months or years. Spending extra time here will pay off significantly in the final results.
Sanding is essential for removing gloss and creating a textured surface that primer can bond to. While some products advertise “no sanding required,” even a light scuff sand greatly enhances adhesion. Deglossers are useful alternatives for homeowners who prefer not to sand manually, though sanding still delivers the strongest bond. Sanding also helps smooth imperfections like scratches or small dents, improving the overall appearance.
Disassembling cabinets is another crucial step. Remove all doors, hinges, and hardware, labeling each piece to ensure it returns to its original location. This method prevents uneven paint lines and allows you to reach every surface thoroughly. Proper preparation leads to a smoother workflow, better finish, and longer-lasting durability.
Priming: Setting Up the Perfect Foundation
Primer is essential for creating a strong foundation that ensures long-lasting durability and prevents peeling or chipping. Using the correct primer seals porous surfaces, blocks stains, and enhances paint adhesion. Bonding primers are ideal for laminate or glossy finishes, while shellac-based or oil-based primers are best for wood cabinets prone to tannin bleed-through. Skipping primer is risky and often leads to failure, especially on surfaces that resist paint.
Knowing the difference between when to prime and when you can skip is important. If you are painting bare wood or switching from a dark color to a light one, primer is mandatory. If the existing finish is in excellent condition and you are repainting with the same type of paint, you might be able to skip priming—but this is rarely recommended for kitchen cabinets. Kitchens are high-moisture environments, and primer adds valuable durability.
Allowing primer to cure fully is important. While primer may feel dry within hours, curing provides maximum adhesion and stability. Rushing the process can cause paint to peel or bubble. Always follow manufacturer recommendations for drying and curing times to ensure optimal results.
Painting Methods for Cabinets
Painting kitchen cabinets requires patience and the right technique to achieve a seamless finish. Using a brush and roller is the most accessible method for homeowners. Applying thin, even coats with high-quality tools minimizes brush strokes and roller texture. Multiple light coats create a smoother result than applying one heavy coat. This technique is ideal for DIYers without access to sprayers.
Spray painting provides the smoothest, most professional-looking finish, as it eliminates brush marks entirely. HVLP sprayers offer precise control and produce fine particles that leave a glass-like surface. However, spraying requires adequate ventilation, proper masking, and more extensive prep work. It is ideal for homeowners comfortable with equipment or professionals seeking a flawless finish.
Most cabinets require at least two to three coats of paint, depending on color and product type. Allowing proper drying and curing time between coats is crucial. Rushing can cause streaks, smudges, or stickiness. Understanding the difference between drying (surface readiness) and curing (full hardness) ensures the finish remains durable long-term.
Common Painting Mistakes (And How to Avoid Them)
One of the most common mistakes homeowners make is failing to clean cabinets thoroughly before painting. Even small traces of grease can cause paint to lift or bubble. Using a degreaser and scrubbing all surfaces—including corners and hardware areas—is vital. Another mistake is skipping primer, especially on glossy or previously coated surfaces. Without primer, paint struggles to adhere properly and often chips within months.
Rushing the project is another major pitfall. Paint requires sufficient time to dry and cure; skipping this step can lead to smudges, fingerprints, and impressions in the surface. Heavy application of paint is also problematic, as thick coats create drips, uneven texture, and poor adhesion. Applying thin layers with proper drying time avoids these issues and ensures an even finish.
Using low-quality tools or the wrong paint type can also ruin the project. Cheap brushes leave streaks and loose bristles, while non-cabinet paints lack durability. Investing in higher-quality products saves time and yields better results. Avoiding these common mistakes ensures long-lasting, beautiful cabinets.
Cost Considerations
Painting kitchen cabinets is more affordable than replacing them entirely. The cost varies based on paint brand, tools, supplies, and whether you hire a professional. High-end cabinet paints tend to cost more due to their superior durability, but the investment is worthwhile. Additional supplies like sandpaper, brushes, rollers, tape, and primer add to the overall cost, but these items are essential for a quality finish.
Hiring a professional typically costs significantly more than DIY, but professionals offer experience, efficiency, and flawless results. They often use sprayers and advanced techniques that DIY projects cannot replicate easily. However, a patient and dedicated homeowner can achieve near-professional results with the right preparation and tools.
Painted cabinets generally last five to ten years, depending on usage and maintenance. Investing in high-quality paint and following proper application techniques increases longevity, saving money in the long run. Proper care and occasional touch-ups extend their lifespan further.
Eco-Friendly & Low-VOC Options
Low-VOC and zero-VOC paints are increasingly popular for kitchen projects due to their reduced emissions and improved indoor air quality. These paints are formulated to release fewer harmful chemicals, making them ideal for homeowners with sensitivities or families with children. Advances in technology have allowed eco-friendly paints to match the durability and performance of traditional cabinet paints.
Brands like Benjamin Moore Natura, Sherwin-Williams Harmony, and Farrow & Ball offer low-VOC or natural formulas without sacrificing quality. These options are especially suitable for indoor winter painting projects where ventilation is limited. Choosing environmentally conscious products contributes to a healthier home and reduces long-term exposure to chemical fumes.
Safety is also a consideration. Even with low-VOC products, wearing protective gear and ventilating the area is recommended. Environmentally friendly paints help minimize odors and speed up the safe drying process, making them a wise choice for many homeowners.
Special Situations & Advanced Techniques
Painting over dark or red-toned woods like cherry or mahogany requires specific techniques to prevent bleed-through. Using a shellac-based primer helps seal tannins and ensures lighter colors apply smoothly. Multiple coats may be necessary for full coverage. Cabinets near stoves or sinks require additional preparation due to grease exposure and moisture damage.
Decorative finishes such as glazing, distressing, and faux aging techniques offer a customized look that enhances personality and style. These methods are ideal for vintage or farmhouse kitchens. They require additional products and steps, but the resulting character and charm make them worthwhile.
Painting the interior of cabinets and drawer boxes is optional but can elevate the overall appearance. Lighter interior colors help brighten the space and make stored items easier to see. However, these areas require paints formulated for high moisture and friction to ensure durability.
Sealing & Topcoats
A topcoat can add extra protection to painted cabinets, though it’s not always required depending on the paint type. Enamel paints typically harden into a durable finish without additional sealing, but chalk paint and some acrylic paints benefit from polyurethane or waterborne topcoats. Adding a topcoat helps protect against scratches, moisture, and discoloration.
Choosing between matte and gloss sealers depends on your aesthetic preferences. Gloss sealers enhance color vibrancy and reflect light, while matte sealers create a subtle, sophisticated finish. Both protect the paint, but gloss highlights imperfections more easily, making matte a popular choice for beginners.
Avoiding yellowing is important, especially for white cabinets. Oil-based sealers tend to yellow over time; therefore, water-based polyurethane is preferred. Applying thin, even coats ensures a clear, durable finish that enhances cabinet longevity.
How to Maintain Painted Cabinets
Maintaining painted cabinets is simple when done consistently. Use gentle cleaners free from harsh chemicals, abrasives, or scrubbing agents. Warm water and mild dish soap are usually sufficient. Avoid excessive moisture, especially around seams and joints, to prevent bubbling or peeling.
Minor chips and scratches are inevitable in high-use kitchens. Touch-up kits or leftover paint can be used to repair small blemishes easily. Keeping hardware clean and functional also helps protect the paint finish by reducing friction and wear on the cabinet surfaces.
An annual inspection allows homeowners to identify problem areas early and perform minor maintenance before issues worsen. Cabinet protectors or bumpers can be added to reduce impact wear, especially on frequently used drawers and doors. Regular care ensures your painted cabinets remain beautiful for years.
Real-World Before & After Case Studies
Homeowners with dated oak cabinets often experience dramatic transformations through painting. Oak’s heavy grain can be minimized with grain-filling techniques or embraced for rustic charm. Painting oak cabinets white or gray brightens kitchens and modernizes the overall look instantly, proving paint’s transformative power.
Builder-grade cabinets benefit significantly from refinishing. These basic cabinets often feature durable structures but outdated finishes. A fresh paint job paired with hardware updates creates a high-end appearance at a fraction of replacement cost. Many homeowners express surprise at how new their kitchen looks after painting.
Luxury finishes are achievable on a budget using the right techniques. Spraying cabinet doors, adding soft-close hardware, and choosing premium paint colors elevate the space. Common lessons learned include the importance of patience, quality tools, and not rushing the curing process.
Product Comparison Charts
Comparing products helps homeowners make informed decisions. The best all-around paints combine durability, ease of use, and a smooth finish. Budget paints offer good performance at lower costs, while professional-grade enamels provide superior durability for demanding environments.
Eco-friendly options are ideal for families sensitive to odors or chemicals. Each product type excels in different categories, allowing homeowners to choose based on their priorities. Whether you value speed, appearance, or longevity, the comparison helps narrow options effectively.
Charts allow quick assessment of factors such as drying time, VOC levels, cost per gallon, and finish options. These guides help match the right product to the specific needs of your project based on surface type, existing finish, and desired outcome.
Conclusion
Choosing the best paint for kitchen cabinets requires understanding your surface type, selecting high-quality paint, and following proper preparation and application techniques. With the right products and careful attention to detail, painted cabinets can rival the quality of factory finishes. Durability, adhesion, and color longevity are crucial factors to consider before beginning.
A well-painted set of kitchen cabinets transforms the space, making it feel fresh and updated. Whether you choose DIY or hire a professional, investing in the right materials ensures long-lasting beauty. With the information in this guide, you can confidently move forward and achieve a stunning kitchen makeover.
Painting cabinets is a rewarding project that delivers maximum impact at minimal cost. With the right approach, your kitchen can look brand new without replacing a single cabinet box. The transformation is not only aesthetic but practical, extending the life of your cabinetry for years to come.
FAQs
1. Is it better to spray or brush kitchen cabinet paint?
Spraying delivers smoother results, but brushing and rolling can look excellent with the right tools.
2. Do I need to sand cabinets before painting?
Light sanding improves adhesion and is highly recommended for long-lasting results.
3. How long does cabinet paint take to fully cure?
Most cabinet paints cure in 2–4 weeks, depending on the brand and environment.
4. Can you use wall paint on kitchen cabinets?
No, wall paint lacks the durability required for high-touch surfaces.
5. What is the most durable paint finish for cabinets?
Semi-gloss and satin enamel finishes are the most durable and easiest to maintain.
6. Can painted cabinets be cleaned with regular kitchen cleaners?
Use mild cleaners only; harsh chemicals can damage the finish.
7. How long will painted cabinets last before needing a refresh?
With proper care, painted cabinets last 5–10 years or longer.
8. What’s the difference between enamel paint and regular paint?
Enamel paint cures harder and offers greater durability and washability.
9. Is chalk paint durable enough for kitchen cabinets?
Only when properly sealed with a strong topcoat.
10. Can I paint over laminate or thermofoil cabinets?
Yes, but only with a bonding primer and high-adhesion paint.
Read more: Schoology Alfa